Installing A Motorcycle Battery Replacement

Regardless of how great your mechanic is, you should know some basic maintenance skills yourself. You never know what can happen on the road, so it’s good to know how to handle the situation on your own.

Replacing a motorcycle battery is one of the things you should know how to do. The process isn’t as challenging, and it can save you quite some time.

Locating, removing, and replacing the battery requires some tools and time, but the entire task isn’t complicated as you’ll see in our step-by-step guide below.

Find and Read Your Manual

Before you gather your tools and get ready to remove the battery, we strongly advise you to find the user manual. Usually, it’s a little book you got with your motorcycle if you bought a new one.

The book contains all the critical information, troubleshooting, and how-to instructions. In there, you might find the best guide on how to replace the battery.

Take some time to find and read it if you have it. If not, maybe try to find one online.

Gather the Proper Tools

You should have all the tools at hand before you start this project. Having it all within reach helps save time and effort on trying to find stuff later on. Also, make sure to wear protective wear such as gloves and goggles.

Protection Goggles and Gloves

Locate and Access the Battery

If you found your service manual, you can probably use it to find a good bit of information on how to do this step. The first step is to know how to locate the battery in order to remove and replace it.

Keep in mind that motorcycles tend to be different, so their batteries are in different locations. Some are inside the upper right fairing, under the fuel tank or the seat. For this reason, you should familiarize with your motorcycle and know where to look for specific parts.

In some cases, you’ll have to remove items such as seat, fuel tank, or a side cover. Either way, your manual will tell you if that’s the case. If it is, now is a good time to remove them so you can easily access the battery.

Find and Disconnect the Negative Cable

Before you remove, you should always make sure to disconnect the negative cable. In most cases, that’s the black cable with the corresponding terminal marked with a “-“ symbol.

This is something you want to be careful with. Switching the order can be quite dangerous if you’re between the positive side of the circuit and the ground. Metal parts near the positive terminal might be a way for the electricity to travel.

You should always work on the negative side first. By doing this, you reduce the possibility of anything going wrong. For example, there’s a gap between the positive terminal on the battery and the frame. If your tool bridges the cap before you remove the negative cable, you’ll probably pop a fuse and possibly burn yourself.

Working on a motorcycle that’s not correctly fused is also quite dangerous since it can start a fire.

It’s a crucial cable to disconnect, which is why that should be your priority. Locate it and get it out of your way once it’s disconnected. Use some tape to get the cable out of the way to prevent making accidental contact with the terminal.

You don’t want to rush anything, so take a while to look at and visualize how it all looks before getting your hands dirty.

Find and Remove the Positive Cable

Once you remove the negative cable and the circuit is broken, you can remove the positive one as well. It’s usually red, but make sure to check that. On this side, the battery is marked with a “+”.

Remove Your Battery

The first step is to remove anything that’s securing the battery. In some cases, it’s a rubber strap or a formed metal piece.

Be careful as you remove it. Some batteries have hollow terminals with lead nuts which can fall out. In most cases, bolts that fall out are impossible to locate later, so you’ll need new ones to replace them.

Also, be careful not to drop the battery or hurt yourself in any way.

Install Your New or Recharged Battery

The first thing you should do is examine the battery. If you’re using a new one, you should make sure the physical size is the same as your old one. Make sure it’s of similar power to what your bike requires as well. Lastly, you should make sure that the negative and positive terminals are in proper order.

If it requires acid, you should fit it before you put it inside the bike. Otherwise, you might spill acid on your motorcycle.

Some batteries don’t come with acid, in which case we recommend you go to the local motorcycle shop where experienced professionals can do this for you. Acid is sold in large quantities that you probably won’t need or use later on.

Filling Motorcycle Battery With Acid

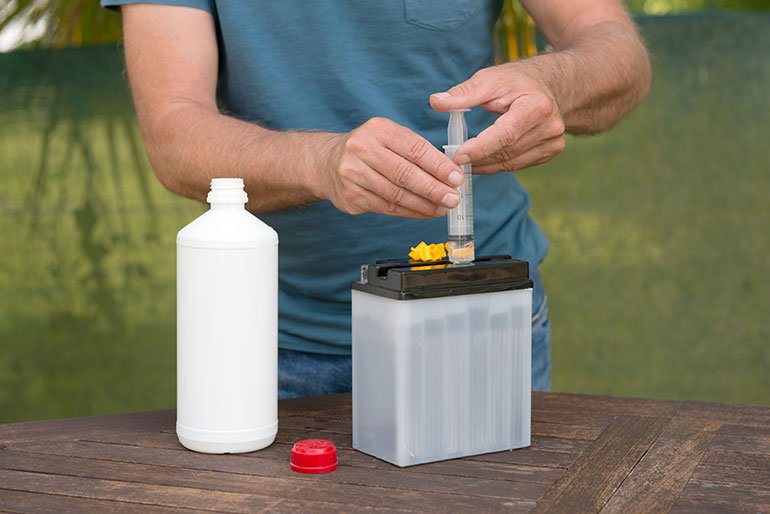
Other batteries do come with acid, so think about what would be more convenient for you. Whatever you do, make sure to follow the manufacturer’s instructions. You should be careful with this and do it outdoors or in a well-ventilated place.

The danger here is the hydrogen gas that’s a byproduct of the chemical reaction. It’s highly flammable, which is why doing it outside is the best choice.

Another thing you’ll have to do is charge the battery as well. Make sure to wear protective equipment because the acid can leave chemical burns. Keep stuff like soapy water and baking soda at hand to neutralize the acid.

Once it’s recharged, you can reinstall it. This can be fairly simple or require some fabrication and creative engineering. Installing a battery that’s a bit different than what the manufacturer intended requires some extra work. Whatever you do, make sure it doesn’t move once it’s installed.

Connect the Cables

Once it’s recharged or replaced and placed back into place, you should connect the cables. Insert the lead nuts into the hollows and put the battery back in.

Reattach the cables and clean them up a bit if they’re corroded. Use a wire brush for this as it’s the most effective tool allowing you to clean without damaging the cable. However, if the wires are too corroded, it might be best to replace them altogether.

Installation is essentially the removal done in reverse. Attach the positive cable and then the negative one. Check a few times if you’ve done this properly. Failing to connect each wire to the correct terminal could be an expensive mistake. It might result in popped fuses, fried electrical components, and a few other problems.

Consider using some terminal spray to prevent corrosion. Check if all the terminals are snug, but tight because the material is often soft.

A useful trick to do is take a piece of the vent hose from your old battery. If you don’t have that, you can use similar vinyl tubing and cut a little piece off. This should act as a spacer that lifts the nut while the pressure keeps the piece from falling out.

If you’re riding a Harley, you might find the terminals offset from the edge of the battery. Though there’s nothing wrong such a model, there’s one more step to take. Some manufacturers include aluminum spacers, but if not, you’ll have to either buy or make them.

Test

Before you put everything back, you should see if there’s power. If there’s power, turn it back off. If you don’t see any lights, you’ll have to investigate a bit more.

Check the connections and if they’re all tight. Make sure also to check if they’re on the correct terminals. You’ll know if you replaced them since the reaction is quite noticeable and you’ll have a lot more work to do if you did.

Testing shouldn’t take much time, but it’s essential nonetheless. Putting the pieces back together only to realize the bike has no power is time-consuming and quite annoying.

Finish

You can now put back the components you removed if everything’s working. Do a final inspection and clean the parts you smudged and got dirty.

Conclusion

As you can see, replacing a motorcycle battery isn’t as complicated as most people think. The process takes some time and requires effort and focus. Still, it’s a generally easy thing to do if you have the right tools and know what you’re doing.

Hopefully, our guide helped you understand how this is done. We suggest you consult with the user manual before you start, but also come back to our guide as many times as you need.

Though it might sound a bit complicated if you’re a beginner, motorcycle battery replacement is one of those maintenance tasks you can do on your own.

Additional Resources

The team at Road Racerz aims to be a source of knowledge for all riders, whether they are beginners, intermediate, or have been riding for 20+ years. We want everyone to enjoy safer rides and have access to rider-specific content to get the most out of every mile.

      Road Racerz